Deploying IBM Verify Identity Access with ArgoCD on Kubernetes
Deploying IBM Verify Identity Access with ArgoCD on Kubernetes
Managing IBM Verify Identity Access (IVIA) deployments across multiple environments can be a significant challenge. Manual configuration leads to drift and inconsistencies over time, causing long-term instability. Combined with GitOps processes, ArgoCD enables a fully declarative deployment and greatly simplifies the management of IVIA environments.
In this post I show how I deployed IBM Verify Identity Access 11.0.3.0 on Kubernetes using ArgoCD. The steps covered include the Web Reverse Proxy instances, IVIA Runtime, Distributed Session Cache, OIDC Provider, LDAP Directory and PostgreSQL database, enabling a complete deployment.
For templating Kubernetes manifests, both Helm Charts and Kustomize are popular choices. I chose Kustomize because it works directly with native YAML files and handles environment-specific differences through a straightforward overlay system without additional abstraction layers.
This post is part of a series on CI/CD deployment. A follow-up post will cover the possibilities of GitOps-based configuration.
An example project is available at https://github.com/pklueter/ivia-argocd-blogpost.
Prerequisites
This post assumes the following are already in place. There are plenty of tutorials online for each of these, so I won't cover their setup here.
- Kubernetes cluster (K3s, OpenShift, etc.)
- Git remote host (e.g. GitHub, GitLab, etc.)
- Domain with configured DNS
- cert-manager for TLS certificates
Deployment Process with ArgoCD
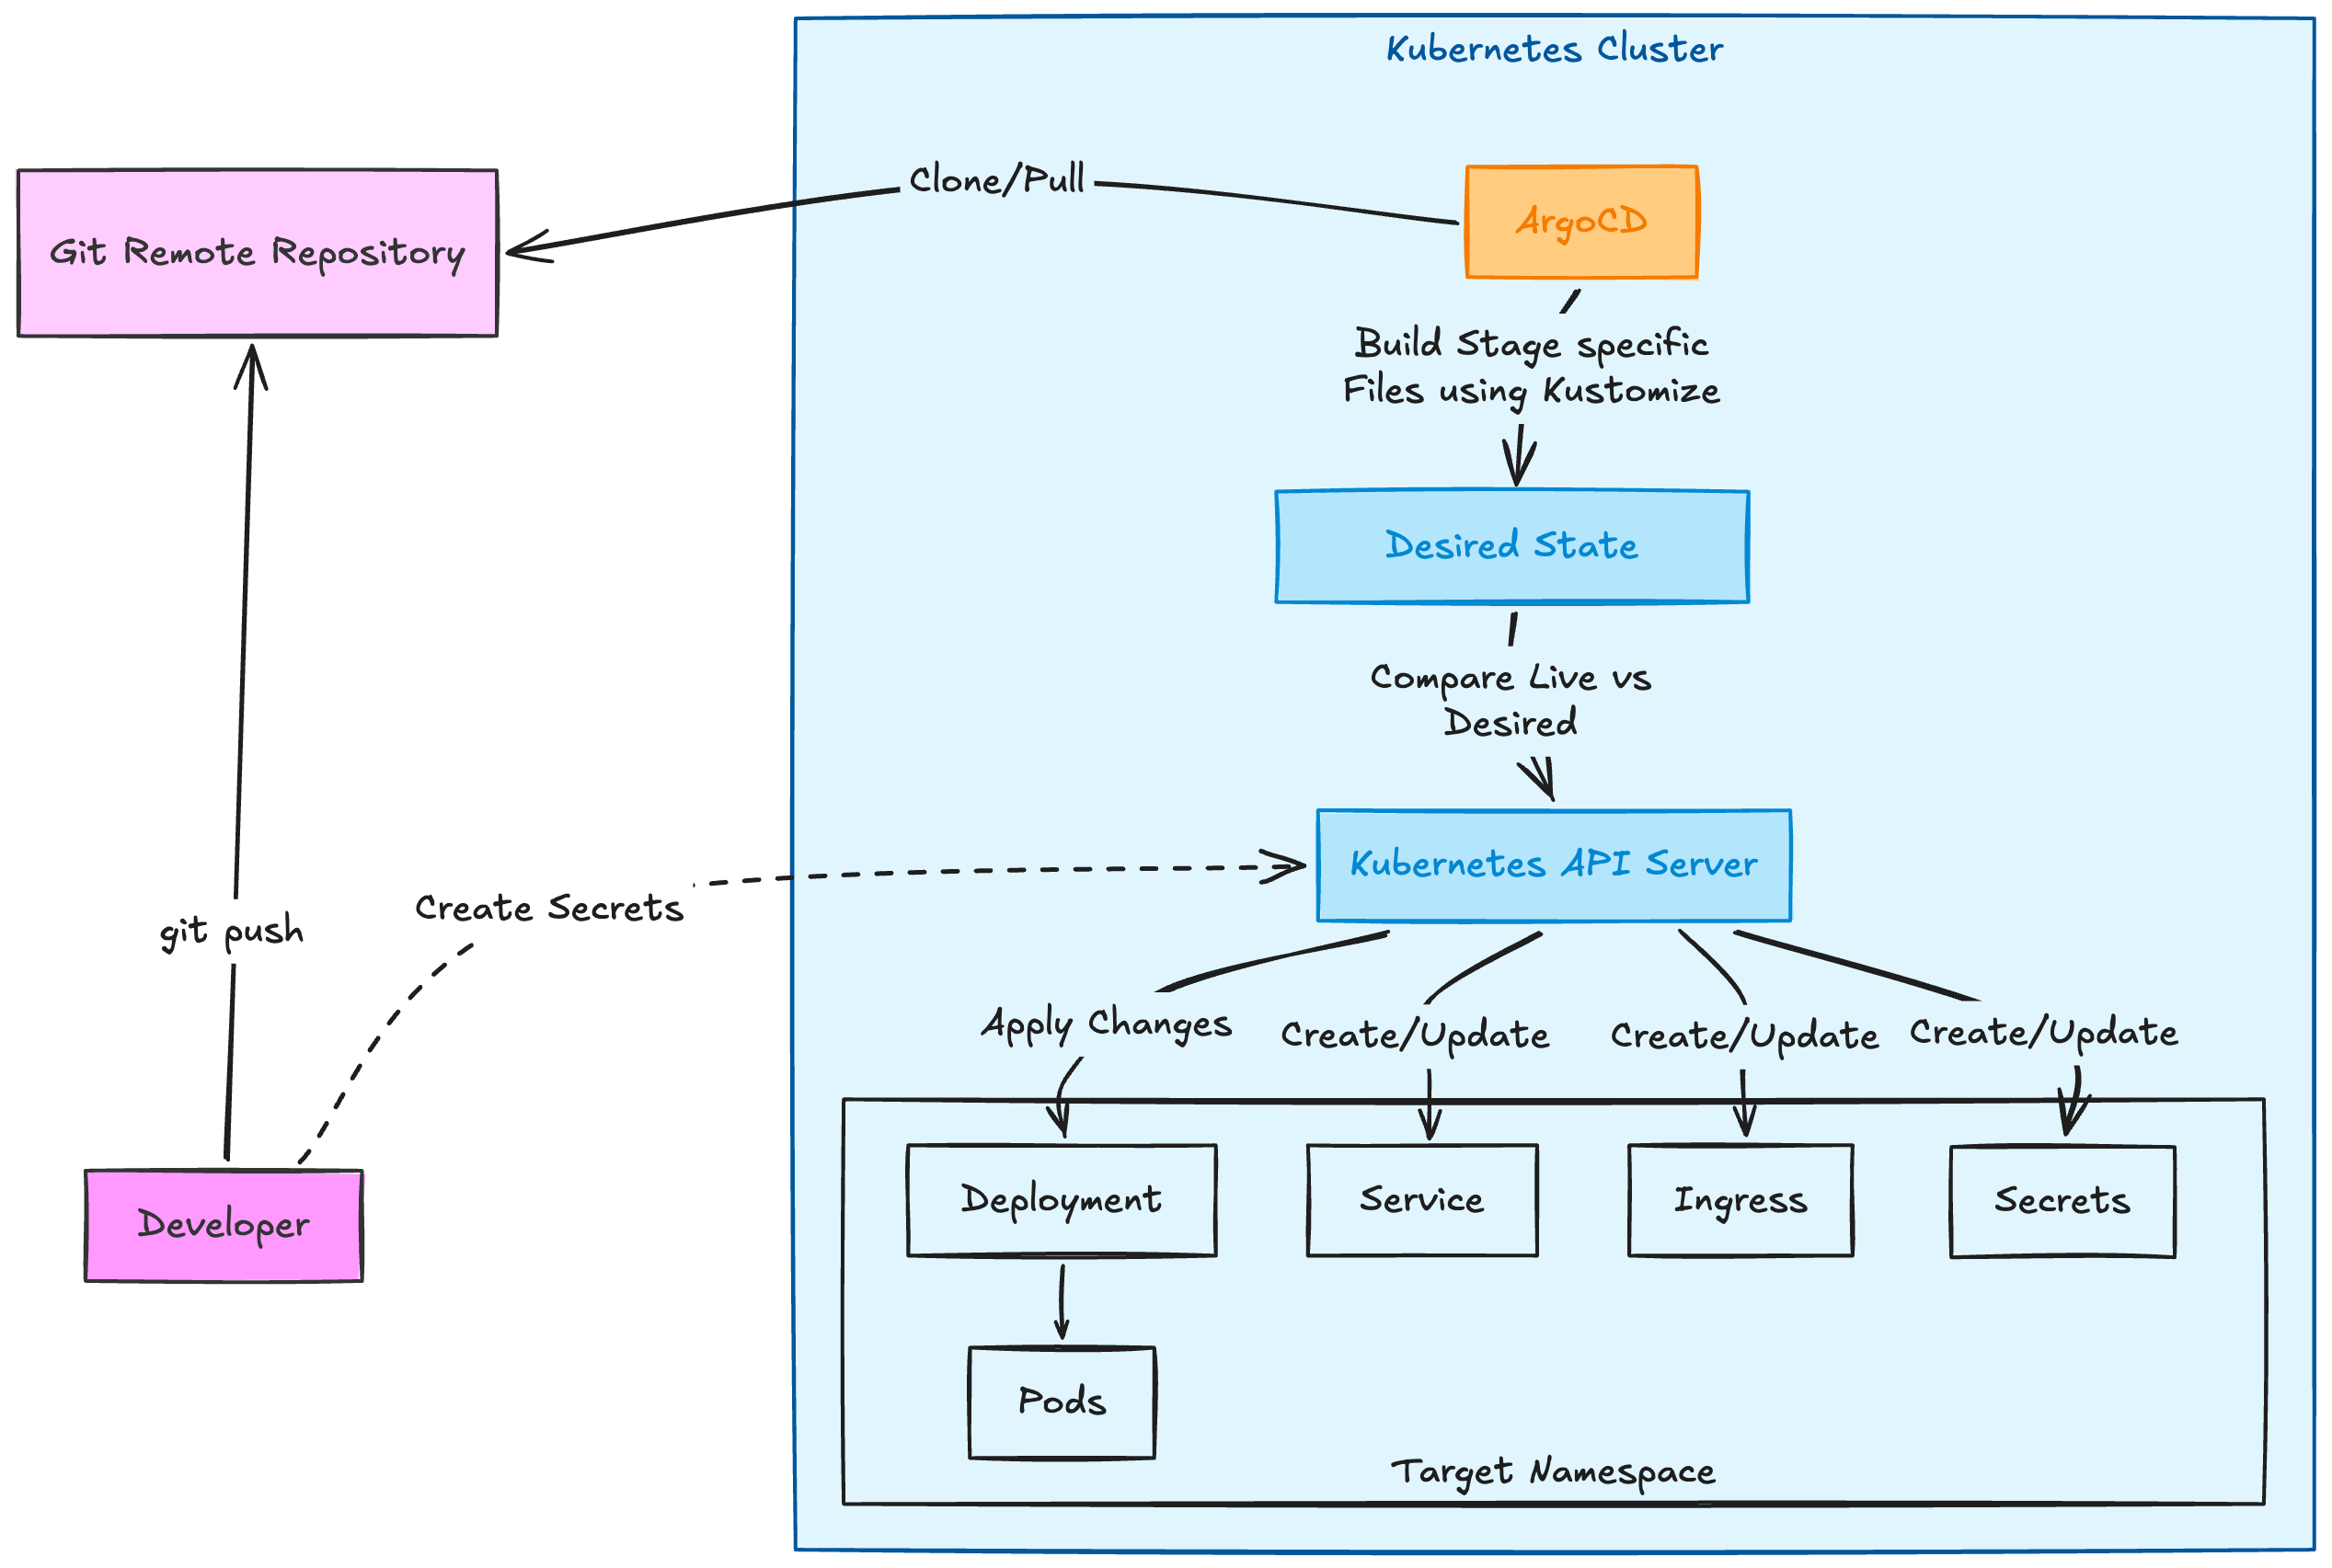
The GitOps workflow with ArgoCD runs in three phases:
- Push changes — The developer runs
git pushto save changes to the remote repository. Secrets that should not be stored in Git are created separately directly via the Kubernetes API. In a production environment this should be handled by a secrets management tool such as HashiCorp Vault. - Synchronisation — ArgoCD continuously monitors the repository. When a change is detected, it clones/pulls the latest state and builds the stage-specific Desired State using Kustomize. By default this happens every 3 minutes. The stage-specific path is taken from the ArgoCD Application definition. See
ArgoCD Application Definitions. - Reconciliation — ArgoCD compares the Desired State against the currently running state in the cluster (Live State). Any divergence is automatically reconciled via the Kubernetes API Server: Deployments, Services, and Ingress rules are created or updated, after which Kubernetes starts the associated Pods.
Git Project Setup
Before deploying, the Git repository needs to be set up.
# Create repository structure
mkdir -p verify-argocd/{kubernetes/{ks,apps,verify-deployment/{verify,ldap,database}},iviaop/config}
cd verify-argocd

# Initialise Git
git init
git add .
git commit -m "Initial repository structure"

# Push to Git hosting service
git remote add origin https://github.com/${your-org}/verify-argocd.git
git push -u origin main
The commands create two main directories:
kubernetes/ This directory contains all Kubernetes artefacts, including Deployments, Persistent Volume Claims (PVCs), ConfigMaps, Services and other resources required to run the application.
iviaop/config/ Unlike classic containers, the modern OIDC Provider container supports fully YAML-based configuration. This directory holds the corresponding configuration files, which are then rolled out automatically via ArgoCD.
Components
The goal of this post is an example deployment of all IVIA components:
- Web Reverse Proxy (WRP): Multiple instances (wrp01, wrp02)
- IVIA Runtime: Advanced Access Control and Federation
- Distributed Session Cache (DSC): Session management
- OIDC Provider: OpenID Connect authentication
- LDAP (IVD): User directory
- PostgreSQL: Database for the Runtime container
Setup
Installing ArgoCD
Installation:
kubectl create namespace argocd
kubectl apply -n argocd --server-side --force-conflicts -f https://raw.githubusercontent.com/argoproj/argo-cd/stable/manifests/install.yaml
I use Traefik as my ingress controller, so I create an IngressRoute. The documentation includes the necessary configuration for many other ingress systems: https://argo-cd.readthedocs.io/en/stable/operator-manual/ingress
kubernetes/ks/ingress.yaml
apiVersion: v1
kind: ConfigMap
metadata:
  name: argocd-cmd-params-cm
  namespace: argocd
  labels:
    app.kubernetes.io/name: argocd-cmd-params-cm
    app.kubernetes.io/part-of: argocd
data:
  server.insecure: "true"
---
apiVersion: cert-manager.io/v1
kind: Certificate
metadata:
  name: argocd-tls
  namespace: argocd
spec:
  secretName: argocd-tls
  issuerRef:
    name: letsencrypt-prod
    kind: ClusterIssuer
  dnsNames:
    - argocd.yourdomain.com
---
apiVersion: traefik.io/v1alpha1
kind: IngressRoute
metadata:
  name: argocd-server
  namespace: argocd
spec:
  entryPoints:
    - websecure
  routes:
    - kind: Rule
      match: Host(`argocd.yourdomain.com`)
      priority: 10
      services:
        - name: argocd-server
          port: 80
    - kind: Rule
      match: Host(`argocd.yourdomain.com`) && Header(`Content-Type`, `application/grpc`)
      priority: 11
      services:
        - name: argocd-server
          port: 80
          scheme: h2c
  tls:
    secretName: argocd-tls
kubectl -n argocd apply -f kubernetes/ks/ingress.yamlArgoCD creates an initial admin password and stores it as a Secret. It can be retrieved with kubectl:
kubectl -n argocd get secret argocd-initial-admin-secret \
  -o jsonpath="{.data.password}" | base64 -d && echo
Repository Structure
The Git repository is the foundation of every ArgoCD project. As described in the introduction, I use Kustomize (https://kustomize.io/) to manage environment-specific configurations while avoiding unnecessary duplication.
The contents of individual files can be found in my example repository: https://github.com/pklueter/ivia-argocd-blogpost
kubernetes/
├── apps.yaml                    # Root ArgoCD Application
├── apps/
│   ├── verify.yml               # IBM Verify Identity Access Application
│   ├── ldap.yml                 # LDAP Application
│   └── database.yml             # Database Application
└── verify-deployment/
    ├── verify/
    │   ├── base/
    │   │   ├── kustomization.yaml
    │   │   ├── service-account.yaml
    │   │   ├── config/              # IVIA Config Container
    │   │   │   ├── deployment.yaml
    │   │   │   ├── services.yaml
    │   │   │   └── pvc.yaml
    │   │   ├── wrp/                 # Web Reverse Proxy
    │   │   │   ├── deployment.yaml
    │   │   │   └── services.yaml
    │   │   ├── runtime/             # IVIA Runtime
    │   │   │   ├── deployment.yaml
    │   │   │   └── services.yaml
    │   │   ├── dsc/                 # Distributed Session Cache
    │   │   │   ├── deployment.yaml
    │   │   │   └── services.yaml
    │   │   └── iviaop/              # OIDC Provider
    │   │       ├── deployment.yaml
    │   │       ├── services.yaml
    │   │       └── config/
    │   └── overlays/
    │       ├── dev/
    │       │   ├── kustomization.yaml
    │       │   ├── ingress.yaml
    │       │   └── iviaop/
    │       │       └── config/
    │       ├── staging/
    │       └── prod/
    ├── ldap/
    │   ├── base/
    │   │   ├── kustomization.yaml
    │   │   ├── deployment.yaml
    │   │   ├── service-account.yaml
    │   │   ├── isvd-config.yaml
    │   │   ├── schema.yaml
    │   │   └── volume-claim.yaml
    │   └── overlays/
    │       ├── dev/
    │       ├── staging/
    │       └── prod/
    └── database/
        ├── base/
        │   ├── kustomization.yaml
        │   ├── psql.yaml
        │   └── pvc.yaml
        └── overlays/
            ├── dev/
            ├── staging/
            └── prod/
Configuration Deep Dive
Kustomize Base Configuration
The base folder contains shared configuration for all IVIA components used across every environment. The kustomization.yaml references the individual resource files.
kubernetes/verify-deployment/verify/base/kustomization.yaml:
resources:
  - service-account.yaml

  # Config Container
  - config/pvc.yaml
  - config/services.yaml
  - config/deployment.yaml

  # WRP
  - wrp/services.yaml
  - wrp/deployment.yaml

  # Runtime
  - runtime/services.yaml
  - runtime/deployment.yaml

  # DSC
  - dsc/services.yaml
  - dsc/deployment.yaml

  # IVIAOP
  - iviaop/services.yaml
  - iviaop/deployment.yaml
  - iviaop/config/op-config.yaml
  - iviaop/config/op-mr.yaml
  - iviaop/config/op-ap.yaml
Generating ConfigMaps
The OIDC Provider configuration lives in ConfigMaps. For easy management, I maintain the configuration in the iviaop/config folder and generate the ConfigMaps from it using kubectl.
# ----------------------------
# Generic IVIA Configuration
# ----------------------------
base_output_dir="kubernetes/verify-deployment/verify/base/iviaop/config"

# Base configuration
kubectl create configmap op-config \
  --from-file=./iviaop/config/*.yml \
  --dry-run=client -o yaml > ${base_output_dir}/op-config.yaml

# Mapping Rules
kubectl create configmap op-mapping-rules \
  --from-file=./iviaop/config/mappingRules \
  --dry-run=client -o yaml > ${base_output_dir}/op-mr.yaml

# Access Policies
kubectl create configmap op-access-policies \
  --from-file=./iviaop/config/accessPolicies \
  --dry-run=client -o yaml > ${base_output_dir}/op-ap.yaml
Environment Overlays
Kustomize overlays handle environment-specific differences — typically hostnames and OIDC clients.
A separate kustomization.yaml is created under kubernetes/verify-deployment/verify/overlays/{environment}/ that references the environment-specific resources.
kubernetes/verify-deployment/verify/overlays/{environment}/kustomization.yaml:
resources:
  - ../../base
  - ingress.yaml
  - iviaop/config/op.yaml
  - iviaop/config/clients.yaml
  - iviaop/config/op-clients.yaml
  - iviaop/config/op-mr-stage-config.yaml
  - iviaop/config/op-ap-stage-config.yaml
The environment-specific OIDC Provider ConfigMaps can be generated the same way as the base ones.
# ----------------------------
# Stage-Specific Configuration
# ----------------------------
stage_output_dir="kubernetes/verify-deployment/verify/overlays/${STAGE}/iviaop/config"

# Static manifests
cp "./iviaop/stage_config/${STAGE}/op.yml" "${stage_output_dir}/op.yaml"
cp "./iviaop/stage_config/${STAGE}/clients.yml" "${stage_output_dir}/clients.yaml"

# ConfigMap: Client definitions
kubectl create configmap op-clients \
  --from-file="./iviaop/stage_config/${STAGE}/clients" \
  --dry-run=client -o yaml > "${stage_output_dir}/op-clients.yaml"

# ConfigMap: Stage-specific mapping rules
kubectl create configmap mr-stage-config \
  --from-file="./iviaop/stage_config/${STAGE}/mapping_rules" \
  --dry-run=client -o yaml > "${stage_output_dir}/op-mr-stage-config.yaml"

# ConfigMap: Stage-specific access policies
kubectl create configmap ap-stage-config \
  --from-file="./iviaop/stage_config/${STAGE}/access_policies" \
  --dry-run=client -o yaml > "${stage_output_dir}/op-ap-stage-config.yaml"
ArgoCD Application Definitions
ArgoCD Applications are the central resource that tells ArgoCD which Git repository, path and destination cluster to use for a deployment. Using the App-of-Apps pattern, a root Application is created that in turn manages all further Applications in the kubernetes/apps/ directory. Changes in the repository are automatically detected and synchronised.
Root Application (kubernetes/apps.yaml):
apiVersion: argoproj.io/v1alpha1
kind: Application
metadata:
  name: verify-apps
  namespace: argocd
spec:
  project: default
  source:
    repoURL: https://github.com/${your-org}/verify-gitops
    path: kubernetes/apps
    targetRevision: HEAD
  destination:
    server: https://kubernetes.default.svc
    namespace: argocd
  syncPolicy:
    automated:
      prune: true
      selfHeal: true
    syncOptions:
      - CreateNamespace=true
IBM Verify Identity Access Application (kubernetes/apps/verify.yml):
apiVersion: argoproj.io/v1alpha1
kind: Application
metadata:
  name: ibm-verify
spec:
  project: default
  revisionHistoryLimit: 2
  source:
    repoURL: https://github.com/${your-org}/verify-gitops
    path: kubernetes/verify-deployment/verify/overlays/{environment}
    targetRevision: HEAD
  destination:
    server: https://kubernetes.default.svc
    namespace: verify
  syncPolicy:
    automated:
      prune: true
      selfHeal: true
    syncOptions:
      - CreateNamespace=true
LDAP Application (kubernetes/apps/ldap.yml):
apiVersion: argoproj.io/v1alpha1
kind: Application
metadata:
  name: ldap
spec:
  project: default
  source:
    repoURL: https://github.com/${your-org}/verify-gitops
    path: kubernetes/verify-deployment/ldap/overlays/{environment}
    targetRevision: HEAD
  destination:
    server: https://kubernetes.default.svc
    namespace: verify
  syncPolicy:
    automated:
      prune: true
      selfHeal: true
    syncOptions:
      - CreateNamespace=true
Database Application (kubernetes/apps/database.yml):
apiVersion: argoproj.io/v1alpha1
kind: Application
metadata:
  name: database
spec:
  project: default
  revisionHistoryLimit: 2
  source:
    repoURL: https://github.com/${your-org}/verify-gitops
    path: kubernetes/verify-deployment/database/overlays/{environment}
    targetRevision: HEAD
  destination:
    server: https://kubernetes.default.svc
    namespace: verify
  syncPolicy:
    automated:
      prune: true
      selfHeal: true
    syncOptions:
      - CreateNamespace=true
Secrets
For security reasons, passwords, certificates and other secrets must never be stored in a Git repository. They must therefore be created manually in the cluster before the first deployment.
Tools such as HashiCorp Vault enable automated management of these secrets — I will cover that integration in a future post.
Scripts in the Example Repository
The example repository includes three shell scripts under scripts/ that automate all required steps. They are driven by a .env file where passwords, domains and other parameters are defined centrally:
# Copy the template and fill in your values
cp scripts/env.example .env
Then run the steps in order:
# 1. Generate TLS certificates and keys
bash scripts/01-generate-certs.sh

# 2. Create Kubernetes Secrets in the cluster
bash scripts/02-create-secrets.sh

# 3. Generate OIDC Provider ConfigMaps from source files and commit
bash scripts/03-generate-configmaps.sh
git add kubernetes/ && git commit -m "chore: generate configmaps" && git push
The following sections describe each step in detail for cases where manual execution or customisation is needed.
First, create the verify namespace where the secrets will live:
kubectl create namespace verifyIVIA Admin Password
The Config Container (iviaconfig) requires the IVIA admin password used to secure the LMI interface:
kubectl create secret generic iviaadmin \
  --from-literal=adminpw=<ivia-admin-password> \
  -n verify
IVIA Config Service
The Config Container provides the other IVIA containers (WRP, Runtime, DSC) with their configuration via an internal Config Service. The password for this is stored as a separate secret:
kubectl create secret generic configreader \
  --from-literal=cfgsvcpw=<config-service-password> \
  -n verify
PostgreSQL
The database container requires a password and a self-signed TLS certificate for encrypted connections.
First generate the certificate. The ivia-postgresql container expects POSTGRES_SSL_KEYDB to point to a combined PEM file (private key followed by certificate), so the two are concatenated:
# Selbstsigniertes TLS-Zertifikat für PostgreSQL generieren
openssl req -x509 -newkey rsa:2048 -nodes \
  -keyout ./postgresql/keys/server.key \
  -out ./postgresql/keys/server.pem \
  -days 365 \
  -subj "/CN=db.verify.svc.cluster.local/O=verify"

# Combine key + certificate into a single PEM file
cat ./postgresql/keys/server.key ./postgresql/keys/server.pem > ./postgresql/keys/server.crt
kubectl create secret generic postgresql-keys \
--from-literal=password=<postgresql-password> \
--from-file=server.crt=./postgresql/keys/server.crt \
-n verifyOIDC Provider Keystores
The OIDC Provider needs TLS certificates and a JWT signing key as keystores, stored in the op-keystores secret.
First generate the required keys and certificates:
# JWT Signing Key (RSA 2048)
openssl genrsa -out ./iviaop/secrets/jwtsigningkey.pem 2048

# TLS key and self-signed certificate for the HTTPS endpoint
openssl req -x509 -newkey rsa:2048 -nodes \
  -keyout ./iviaop/secrets/https/personal/server_key.pem \
  -out ./iviaop/secrets/https/signer/server_cert.pem \
  -days 365 \
  -subj "/CN=iviaop/O=verify"

# Package keystores as ZIP (as expected by the container)
cd ./iviaop/secrets && zip https.zip https/personal/server_key.pem https/signer/server_cert.pem && cd -
The PostgreSQL CA certificate for the encrypted database connection is derived from the PostgreSQL keys created in the previous step:
cp ./postgresql/keys/server.crt ./iviaop/secrets/server.pemThen create the secret:
kubectl create secret generic op-keystores \
  --from-file=jwtsigningkey.pem=./iviaop/secrets/jwtsigningkey.pem \
  --from-file=https.zip=./iviaop/secrets/https.zip \
  --from-file=server.pem=./iviaop/secrets/server.pem \
  -n verify
OIDC Provider Passwords
Database password and LDAP bind password for the OIDC Provider:
kubectl create secret generic op \
  --from-literal=db_password=<postgresql-password> \
  --from-literal=ldap_password=<ldap-bind-password> \
  -n verify
LDAP (IVD)
The IVD container requires an admin password, a server key for LDAPS and a license file.
The license key can be downloaded from IBM Passport Advantage.
Generate the TLS certificate for LDAPS:
openssl req -x509 -newkey rsa:2048 -nodes \
  -keyout ./ivd/server_key.pem \
  -out ./ivd/server_cert.pem \
  -days 365 \
  -subj "/CN=ivd.verify.svc.cluster.local/O=verify"

# Combine key + certificate into a single PEM file
cat ./ivd/server_key.pem ./ivd/server_cert.pem > ./ivd/server.pem
Create the secrets:
# Admin password
kubectl create secret generic ivd-passwords \
  --from-literal=admin=<ivd-admin-password> \
  -n verify

# Server certificate (key + cert as combined PEM)
kubectl create secret generic ivd-server-keys \
  --from-file=server.pem=./ivd/server.pem \
  -n verify

# License file (download from IBM Passport Advantage)
kubectl create secret generic ivd-license-key \
  --from-file=ivd-10.0.0_license_key_limited.txt=./ivd/ivd-10.0.0_license_key_limited.txt \
  -n verify
Deployment
With the App-of-Apps pattern, a single command is enough to bring up all IVIA, LDAP and database applications:
kubectl apply -f kubernetes/apps.yamlOnce the root Application is created, ArgoCD takes over. It detects the Applications in the kubernetes/apps/ directory and starts deploying all components in the correct order:
- The
verifynamespace is created if it does not already exist. - The PostgreSQL database is started with persistent storage, as it is a dependency for the Runtime and OIDC Provider.
- The LDAP directory server is deployed and provides the user directory.
- The IBM Verify Identity Access components (WRP instances, Runtime, DSC, OIDC Provider) are rolled out and connect to the database and LDAP.
- Services and Ingress resources are configured and traffic is routed to the respective components.
Verification
After deployment, the status of all Applications can be queried via the ArgoCD CLI. argocd app list gives a quick overview; argocd app get provides details for a single Application:
argocd app list
argocd app get ibm-verify
CLI installation instructions: https://argo-cd.readthedocs.io/en/stable/cli_installation/
Check the pod status in the verify namespace directly with kubectl:
kubectl get pods -n verifyWhen all components have started successfully, the output should look similar to this:
NAME                           READY   STATUS    RESTARTS   AGE
iviaconfig-xxx                 1/1     Running   0          5m
wrp-rp01-xxx                   1/1     Running   0          5m
wrp-api-xxx                    1/1     Running   0          5m
wrp-oidcrp-xxx                 1/1     Running   0          5m
iviaruntime-xxx                1/1     Running   0          5m
iviadsc-xxx                    1/1     Running   0          5m
iviaop-xxx                     1/1     Running   0          5m
isvd-xxx                       1/1     Running   0          5m
postgresql-xxx                 1/1     Running   0          5m
Note: The WRP containers start and report as
Running, but their services are not fully available until a configuration snapshot has been loaded and deployed via the Config Container LMI. Only after that do the WRP instances receive their configuration and become fully operational. The LMI is accessible atlmi.yourdomain.com.
Accessing Services
Configure DNS to point to the cluster's load balancer:
lmi.yourdomain.com- IVIA Config LMIverify.yourdomain.com- WRP instance wrp-rp01api.yourdomain.com- WRP instance wrp-apirp.yourdomain.com- WRP instance wrp-oidcrpargocd.yourdomain.com- ArgoCD UI